
Create Your Animated Film or Series Starting at Just $500,000

By 3D Lip Sync No Comments

Create Your Animated Film or Series Starting at Just $500,000
UNOMi is powering the next generation of animation with AI-driven tools and streamlined production

At UNOMi, we believe in removing the barriers that hold creators back. That’s why we’ve partnered with Pixel Pirate Studio to offer a groundbreaking production service that brings animated films and series to life starting at only $500,000.

By combining top-tier creative talent with UNOMi’s advanced animation technology, we’re making high-quality animation faster, smarter, and more accessible than ever before.

Here’s how UNOMi makes it possible:

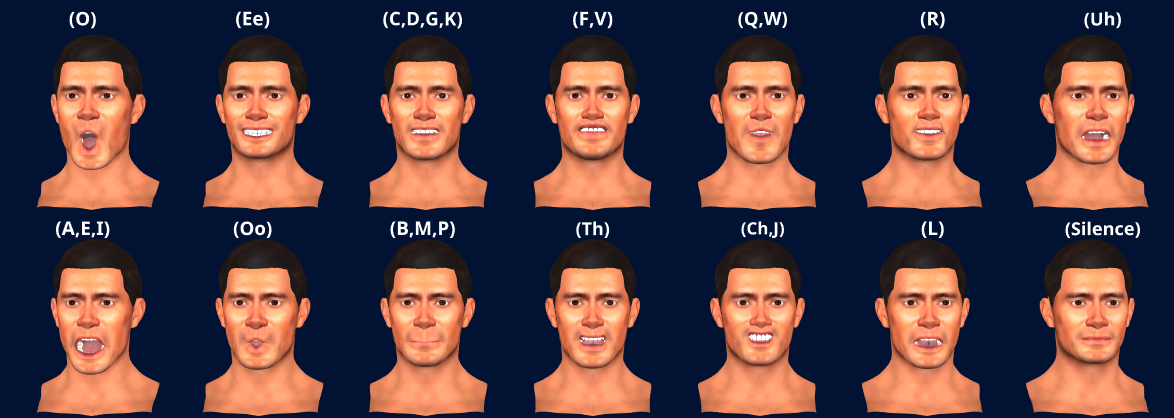
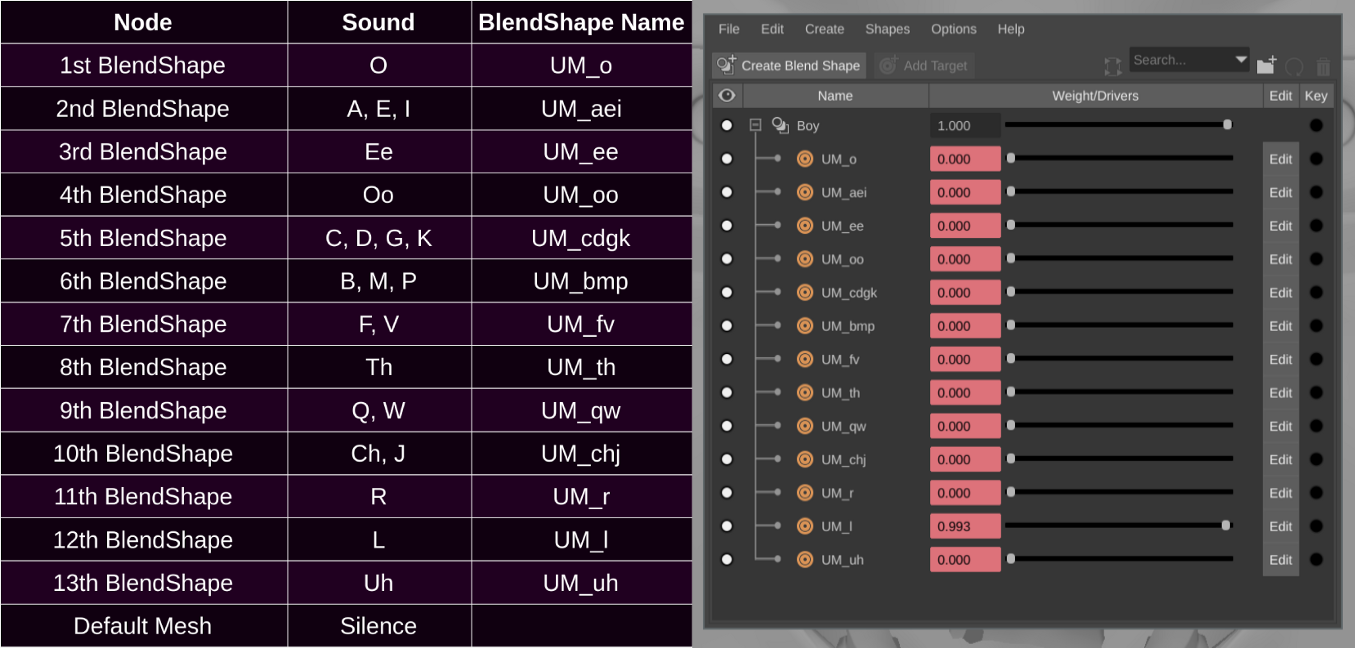
  • AI-Driven Auto Lip Syncing
    Instantly match dialogue to character mouth movements, reducing weeks of manual labor down to minutes.

  • Markerless Motion Tracking
    No suits, no hardware—just natural movement captured and applied to characters using our computer vision technology.

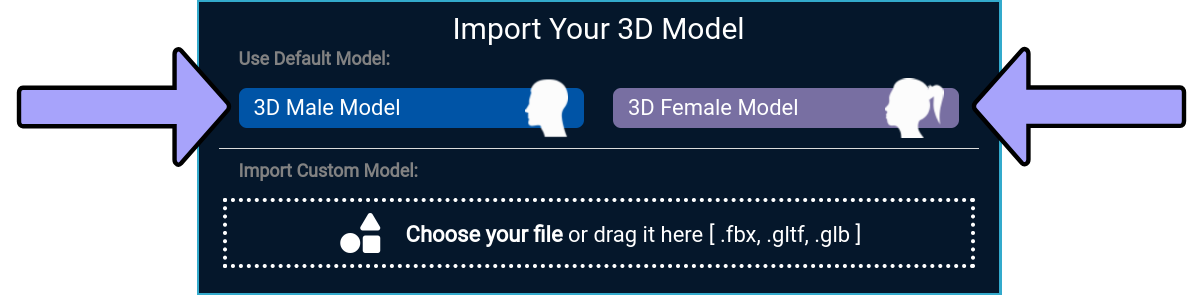
  • Text-to-Animation Technology
    Simply describe a scene, and our tools help pre-visualize and animate it, dramatically speeding up development.

UNOMi doesn’t just reduce production costs—it empowers studios and creators to move from concept to completion with agility and creative control. Pixel Pirate Studio’s Emmy-nominated team provides the design, story, and production expertise, while we supply the technology that gets it done faster and more efficiently.

This service is ideal for IP holders, authors, entrepreneurs, and entertainment companies looking to adapt their stories into animated content without needing a multi-million-dollar budget.

From 2D or 3D animation to sound design, post-production, and distribution support, this partnership covers it all.

Start building your animated world today. Let’s bring your vision to life—powered by UNOMi.

Contact us to learn more or schedule a consultation.

3D AI Lip Syncing Software

By 3D Lip Sync No Comments

The UNOMi 3D lip-syncing software is an advanced AI (Artificial Intelligence) software that allows you to sync the mouth poses of your 3D characters. The stand-alone software works best with Maya but can also work with Blender and other 3D software suites.

Unomi3DLS x Maya

By 3D Lip Sync, News No Comments

This document goes through the process of creating detailed 3D speech animations in Unomi as well as attaching these animations onto any of your creations in Maya.

Preface

In order to get amazing 3D Lip Sync animations, we need a set of blendshapes for different phonetic sounds our character might make.

Unomi uses machine learning to find the timings of phonetic sounds and create detailed speech animations.

Once we have these blendshapes configured for various phonetic sounds, we’re then able to quickly pump out as many speech animations as we like.

Configuring your model

1. Add a BlendShape Node

This can be for an existing character in your Maya project portfolio or something totally new. The important thing is that you set up a blendshape node which targets all meshes you want to see moving when your character is speaking (such as the tongue, lips, teeth, face, etc).

2. Sculpt BlendShapes for Phonetic Sounds.

We next add blendshapes and sculpt them to match our character making speech related phonetic sounds. The phonetic sounds we want to sculpt blendshapes for are as follows:

The name and order of the blendshapes themselves is important here so that the animation can be applied correctly. Here’s a screenshot of a blendshape node configured correctly.

You can re-order and re-name your blendshapes by selecting your blendshape node and then clicking: Windows > Animation Editors > Shape Editor.

Make sure the names and order of your blendshapes match what’s pictured above. This configuration of the blendhapes is important so that your animation will target your model correctly. The blendshape node itself can be called whatever you like, but take note of its name because you’ll need it when exporting your animations from Unomi.

Enabling the Animation Plugin

The animation plugin is a free plugin included with Maya by default which enables you to import and export .anim files.

Once you’ve enabled this plugin, You can attach beautiful lip sync animations generated by Unomi directly onto your model. You can enable it by navigating Windows > Settings/Preferences > Plug-in Manager.

Search for the animImportExport plugin and tick Loaded and Auto-Load:

Note: We recommended that you restart Maya after activating/enabling the plugin. Although it should be usable immediately, many users report it still will not work until Maya is restarted.

Making Lip Sync Animations

Smooth sailing from here, open the Unomi3DLS app and sign in.

1. Setup Your Project

While making our animation, we’ll be temporarily previewing our animation on either the included male or female model. Feel free to select either.

You’ll also need to get an audio file (.mp3, .wav) which contains the dialogue you want to animate on your character as well as a text file (.txt) containing the words spoken in the dialogue.

2. Generate Your Animation

Once you’ve selected a default model to preview and imported your audio/text you have everything needed to make an animation. Just hit sync and grab a drink while a computer cluster in the cloud uses creates your speech animation.

Upwards of ~100 phonetic sounds will be animated per 15 seconds of audio. The app translates your text into phonetic sounds and then leverages machine-learning to find the location/duration of those sounds in the audio to create a detailed lip sync animation.

At this point you can playback and review your animation. If you’d like to make any changes you can do so now.

3. Export your animation

When you’re happy with your animation, you can hit Export and then choose to export to an .anim file.

The .anim file needs to know the name of the blendshape node it will be targeting in Maya, so make sure you put in the right name when prompted by the exporter.

Make sure you specify the name of your blendshape node when exporting your Unomi animations such that the name matches your blendshape node name in Maya.

Now that you have your .anim file with your lip sync animation, you can attach it to any of your models in Maya with a properly configured blendshape node. Just select your blendshape node in the outliner:

You need to select the blendshape node before you import your .anim file.

Then navigate:

File > Import > (Your.anim File)

Your animation will exactly match the length of the audio you synced to. Make sure you select your frame-rate and animation layer before you import your .anim file.

That’s it!

You should be all done! Since your model is setup for Unomi3DLS animations now, you can crank out as many more lip syncs as you like.

If you need any more advice, feel free to shoot me an email at: llama@getunomi.com

You can also grab a free 7 day trial of Unomi from: https://getunomi.com